Using OpenWeather Map API in a Python Flask App
Published on: January 2, 2025
Table of Contents
Get the API key
Download project files
Set up the directory structure
Download the weather icons
Create your virtual environment
Activate your virtual environment
Install the required libraries
Write the code
More on OpenWeather
What next
OpenWeather provides weather services through APIs that you can use to display current, future, and historical weather conditions for a given place and time. In this tutorial, we will use their free service and build a simple Python Flask app that uses the OpenWeather One Call API 2.5 and the OpenWeather Geocoding API. Based on user input into a form, we will retrieve current weather data from OpenWeather and display some of that data in a browser.
This tutorial assumes that you have Python installed, a code editor, used the Python command line interface to write commands, and a little experience with Python.
Get the API key
Before you start coding, you will need an API key, which is free and no credit card information is required. You need only to create an account, and an API key will be generated and emailed to you.
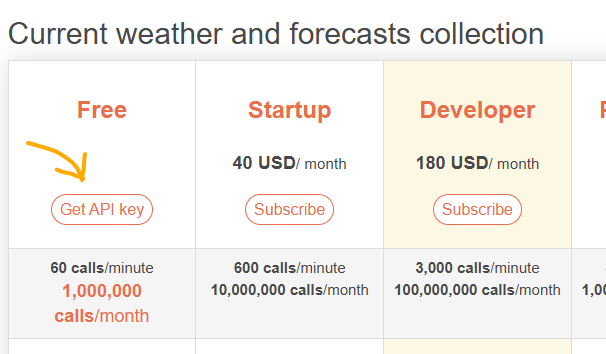
Go to the OpenWeather pricing page. Scroll down to the "Current weather and forecasts collection" section shown below. Under the "Free" heading, click Get API key.
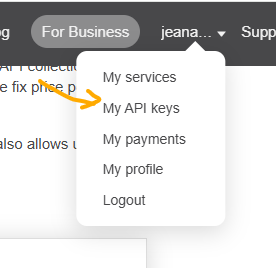
Complete the Create New Account form, and follow the instructions to verify your email. OpenWeather will email your API key to you. You can also sign in to the OpenWeather website and access your API key(s). Click your user name in the top right corner and choose My API keys (as shown below).
Download project files
If you like, download the project files from GitHub and skip to Create your virtual environment.
Set up your directory structure
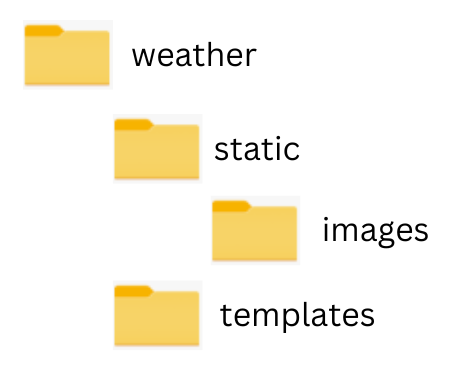
If you did not download the project files, create a new weather directory. Inside the weather directory, create the following structure:
Download the weather icons
If you did not download the project files from GitHub and want to display the weather icons, get the images from OpenWeather and put them in the images folder.
Create your virtual environment
Creating a virtual environment for your project ensures that the packages you install will be specific to your weather project and will not create conflicts with other projects.
In your console, navigate to the weather directory. To create your virtual environment, in the console, input the command below for your operating system:
- Windows:
python -m venv venv - macOS/Linux:
python3 -m venv venv
Python will create a venv directory inside the weather directory. This is where the packages will be installed.
Activate your virtual environment
To activate your virtual environment, input the command below for your operating system:
- Windows:
.\venv\Scripts\activate - macOS/Linux:
source venv/bin/activate
In your console, you should see "(venv)" at the beginning of the command line, indicating your virtual environment is active.
Install the required libraries
You need only two libraries: Flask and Requests. Flask is used to build small- to medium-sized web applications in Python, and Requests is used to make HTTP requests. For detailed documentation, see Flask and Requests.
To install the packages, input the command below for your operating system:
- Windows:
pip install Flask requests - macOS/Linux:
pip3 install Flask request
Write The Code
There are two files in this project:
- templates/index.html: This file is stored in the templates directory. This is where the user will input a city, state two-letter abbreviation (for US only), and country two-letter abbreviation. When the user submits the form, the weather conditions are displayed below the form.
- get_weather.py: This file will take the location information submitted in the index.html form and send it to the Geocoding API to get a corresponding longitude and latitude. Then it will use the longitude and latitude to request weather data from the One Call API. Finally, it will gather pieces of weather data and return that data to index.html for display.
- Send the request and put the data received in the
responsevariable. - If the status code received is not in the 200 range, raise an exception.
- Parse the response as JSON and put it in the
datavariable. - Convert the wind direction,
wind_deg, into a friendly text version (e.g. NE or SW) using theget_wind_directionfunction created further down. - Put the
weather_iconin theurl_forfunction to construct a URL for the icon. The icons are located in the static/images directory. If you did not download the project files, you can get them directly from OpenWeather here. - Handle any exceptions that occurred in the try block of code.
- Create the
get_wind_directionfunction. - Set the Flask development server to only start if the script is run directly. Remove these last two lines of code in a production environment.
flask --app get_weather run
index.html
This is a very basic HTML file stored in your templates directory. Spruce it up with CSS or style sheets as you see fit. First add the document type declaration, head, and beginning body tag:
    <!DOCTYPE html>
    <html>

    <head>
        <title>Weather App</title>
    </head>

    <body>
Next, we build the form the user will submit and the div element, weatherInfo, where the weather data will be displayed. Note the form action is not set. The JavaScript we include next will process the form and fetch the weather data from the get_weather.py script.
    <h2>Get Weather</h2>

    <form id="weatherForm" action="" method="get">
        <label for="city">City:</label>
        <input type="text" id="city" name="city">

        <label for="state">State:</label>
        <input type="text" id="state" name="state" maxlength="2" size="2">

        <label for="country">Country:</label>
        <input type="text" id="country" name="country" maxlength="2" size="2">

        <button type="submit">Get Weather</button>
    </form>

    <div id="weatherInfo"></div>
Now we write the JavaScript to listen for the form submit event, get the information (city, state, and country) input into the form, and create city, state, and country variables to hold that information.
    <script>
        const form = document.getElementById('weatherForm');

        form.addEventListener('submit', async (event) => {
            event.preventDefault();

            const city = document.getElementById('city').value;
            const state = document.getElementById('state').value;
            const country = document.getElementById('country').value;
Next we use the city, state, and country variables to construct the URL, make a request to get_weather.py, and wait for the response. When we receive the response, we parse it as JSON and put it in the data variable.
            try {
                const response = await fetch(`http://localhost:5000/get_weather?city=${city}&state=${state}&country=${country}`);
                const data = await response.json();
Once we have retrieved the data, we check for and display errors in the weatherInfo div. If there is no error, we format and display the location and weather details.
                const weatherInfoDiv = document.getElementById('weatherInfo');
                if (data.error) {
                    weatherInfoDiv.innerHTML = `<p>${data.error}</p>`;
                } else {
                    weatherInfoDiv.innerHTML = `<h2>Weather in
                    ${data.city}, ${data.state}, ${data.country}<</h2>
          <p>Temperature: ${data.temperature} °F</p>
          <p>Winds: ${data.winds}</p>
          <p>Conditions: ${data.conditions}</p>>
          <p><img src="${data.icon_url}" alt="${data.conditions}"></p>`;
                }
Finally, we handle errors occurring during the network request or within the JavaScript code itself. If there is an error, we log it to the browser console and display a simple error message in the weatherInfo div for the user.
            } catch (error) {
                console.error('Error fetching weather data:', error);
                const weatherInfoDiv = document.getElementById('weatherInfo');
                weatherInfoDiv.innerHTML = '<p>Error fetching weather data.
                Please try again.</p>';
            }
        });
        </script>

</body>

</html>
get_weather.py
This file is stored in the weather directory. To begin, we import the Flask and requests libraries.
from flask import Flask, render_template, request, jsonify, url_for
import requests
Next, we create the Flask object app, including a definition of where template files and static files, such as images and CSS files, are stored. App routing defines what to return to the user upon coming to the app's root directory, in this case, index.html.
#create flask object
app = Flask(__name__, template_folder='templates', static_folder='static')

@app.route('/')
def index():
    return render_template('index.html')
Now, we define app routing for requests to the get_weather.py. We put the values from the request arguments (coming from index.html) into city, state, and country variables.
@app.route('/get_weather')
def get_weather():

    #process the arguments from the get request
    city = request.args.get('city')
    state = request.args.get('state')
    country = request.args.get('country')
Next, we move on to the request to the Geocoding API. We build the URL, adding the city, state, country, and API key values. Replace YOUR_API_KEY with the API key you obtained from OpenWeather. Then:
    try:
        # Get latitude and longitude using Open Weather Map geocoding API
        api_key = "YOUR_API_KEY"
        url = f"http://api.openweathermap.org/geo/1.0/direct?q={city},{state},{country}&appid={api_key}"
        response = requests.get(url)

        response.raise_for_status()  # Raise an exception for bad status codes

        data = response.json()
NOTE:
If you query the Geocoding API directly in your browser, the JSON you get looks something like this.
[

    {
    "name": "Portland",
    "local_names": {
        "bg": "Портланд",
        "da": "Portland",
        "ru": "Портленд",
        "mr": "पोर्टलंड",
        "sq": "Portland",
        "fa": "پورتلند",
        "nl": "Portland",
        "et": "Portland",
        "sl": "Portland",
        "tr": "Portland",
        "fo": "Portland",
        "hr": "Portland",
        "ta": "போர்ட்லன்ட்",
        "id": "Portland",
        "bn": "পোর্টল্যান্ড",
        "ja": "ポートランド",
        "ko": "포틀랜드",
        "el": "Πόρτλαντ",
        "pt": "Portland",
        "lv": "Portlenda",
        "te": "పోర్ట్ లాండ్",
        "ms": "Portland",
        "ro": "Portland",
        "en": "Portland",
        "ka": "Portland",
        "hu": "Portland",
        "lt": "Portlandas",
        "de": "Portland",
        "hy": "Պորտլենդ",
        "fy": "Portland",
        "tl": "Portland",
        "ca": "Portland",
        "es": "Portland",
        "fr": "Portland",
        "ku": "Portland",
        "be": "Портленд",
        "uk": "Портленд",
        "af": "Portland",
        "mk": "Портланд",
        "az": "Portlend",
        "ar": "بورتلاند",
        "sv": "Portland",
        "oc": "Portland",
        "sk": "Portland",
        "mg": "Portland",
        "th": "พอร์ตแลนด์",
        "fi": "Portland",
        "vi": "Portland",
        "hi": "पोर्टलैंड",
        "gu": "પોર્ટલેન્ડ"
    },
    "lat": 45.5202471,
    "lon": -122.674194,
    "country": "US",
    "state": "Oregon"
    }
]
In the response data, what we are looking for are the lat and lon values. In the code, we take those values from the data variable and put them into the latitude and longitude variables. Multiple locations can be returned, so in the code below, we access the first location by the index [0].
If no data is returned from the Geocoding API, we return an error to index.html.
        if len(data) > 0:
            latitude = data[0]['lat']
            longitude = data[0]['lon']
        else:
            return jsonify({"error": "Location not found."}), 404
With the latitude and longitude set, we construct the URL for the One Call API. In the code below, I have added the argument &units=imperial to the end of the URL. You can also set units to "metric" or "standard." If you exclude the units argument, the default unit is standard.
base_url = f"https://api.openweathermap.org/data/2.5/weather?lat={latitude}&lon={longitude}&appid={api_key}&units=imperial"
NOTE:
If you query the One Call API in your browser, you will get JSON back, as we did with the Geocoding API. The JSON contains many weather details you can access. A formatted sample response is below.
{

    "coord": {
        "lon": -122.6742,
        "lat": 45.5202
    },
    "weather": [
        {
            "id": 803,
            "main": "Clouds",
            "description": "broken clouds",
            "icon": "04d"
        }
    ],
    "base": "stations",
    "main": {
        "temp": 44.89,
        "feels_like": 41.04,
        "temp_min": 42.53,
        "temp_max": 46.63,
        "pressure": 1029,
        "humidity": 95,
        "sea_level": 1029,
        "grnd_level": 1018
    },
    "visibility": 10000,
    "wind": {
        "speed": 7,
        "deg": 213,
        "gust": 11.01
    },
    "clouds": {
        "all": 75
    },
    "dt": 1735586676,
    "sys": {
        "type": 2,
        "id": 2013569,
        "country": "US",
        "sunrise": 1735573844,
        "sunset": 1735605360
    },
    "timezone": -28800,
    "id": 5746545,
    "name": "Portland",
    "cod": 200
}
We send the request using the URL constructed above and put the data received in the response variable. We raise an exception if the status code received is not in the 200 range. We parse the response as JSON and put it in the weather_data variable.
        response = requests.get(base_url)
        response.raise_for_status()  # Raise an exception for bad status codes
        weather_data = response.json()
We put the wind speed, wind direction (in degrees), and the weather icon from weather_data into variables. These pieces of information require some formatting:
        wind_speed = weather_data["wind"]["speed"]
        wind_deg = weather_data["wind"]["deg"]
        weather_icon = weather_data["weather"][0]["icon"]
        wind_direction = get_wind_direction(wind_deg)
        wind_speed_with_direction = f"{wind_speed} m/s {wind_direction}"
        weather_icon_url = url_for('static', filename=f'images/{weather_icon}@2x.png')
Now, we use the wind_speed_with_direction, weather_icon_url, city,
state, and country variables to build a Python dictionary. We also include the temperature and weather description data from the weather_data JSON. Lastly, we return the weather_data to index.html as JSON for display.
        weather_data = {
            "temperature": weather_data["main"]["temp"],
            "conditions": weather_data["weather"][0]["description"],
            "icon_url": weather_icon_url,
            "winds": wind_speed_with_direction,
            "city": city,
            "state": state,
            "country": country
        }

        return jsonify(weather_data)
To wrap it up, we:
    except requests.exceptions.RequestException as e:
        return jsonify({"error": f"Error fetching weather data: {e}"}), 500

def get_wind_direction(degrees):
    directions = ["N", "NNE", "NE", "ENE", "E", "ESE", "SE", "SSE",
                  "S", "SSW", "SW", "WSW", "W", "WNW", "NW", "NNW"]
    index = int((degrees + 11.25) / 22.5) % 16
    return directions[index]

if __name__ == "__main__":
    app.run(debug=True)
Run the Flask app in your browser
To run the Flask app in your browser, start the Flask server. In your console, type the following command:
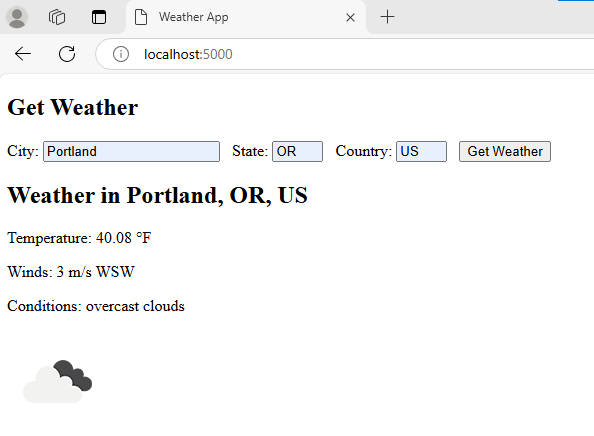
Open your browser and in the address bar, type: localhost:5000. You should see the form to input a city, state, and country. Submit the form, and the weather data should display below the form.
More on OpenWeather APIs
OpenWeather is moving toward requiring credit card information for all subscriptions. The One Call API 2.5 remains available but is being deprecated. The documentation is here.
The documentation for current API versions is available here.
What next?
Now that you have created a simple Flask app, I recommend reading more on Flask, JSON, and Requests.